
 We are lucky enough to again have Phil paint the backdrops for all our shows, his style now being famous to the huge Alpha audience alumni!
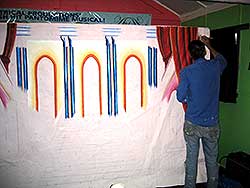
We use a unique method for designing and drawing the picture on the canvas, involving tracing and an LCD projector.
Each design is either hand drawn by Phil, or we trace in a design and then project it onto the canvas/set. Each scene for Sleeping Beauty had 5 canvases/designs, compared with only 3 in each scene for previous shows. This was because we also had a more interactive set, with a dungeon, and a cottage with doors, as well as the entire set being wider to accommodate the majority of venues being quite wide. This will mean a more aesthetically impactful set for our new show for 2005.
Here’s what Phil has to say about painting backdrops:
 There are many ways I am sure of painting great sets, however here at Alpha we have found some ways of making the job as quick as possible.
- Paint the canvas first, and cut it over size as it will shrink. Use a light colour, I use ordinary house paint. Some times paint can be picked up cheaper at a paint shop when they mix it up incorrectly. You can also pick up seconds of colours as sample pots for a few dollars as well. I use a 50mm cutting in brush for most work, a 9mm flat brush and a tiny round brush for outline. We trace the main elements of the picture, and use a data projector to help sketch the outline on the canvas. After each stage of painting you will have to redraw some objects as you go over the line with each layer. The first tracing is often not level, so I use a level to draw and redraw horizontals and verticals.
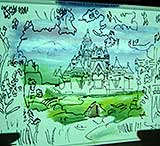
- Try and find a picture of what you want the set to end up like. Coming up with your own design is quite difficult. Sometimes you can combine several pictures, or use part of one. Using pictures already painted (from a show) for your first one is much easier than using a photo. You can see how the artist has made things look 3D by use of shading. They also normally put less clutter in, and simplify the scene. Learn how to make objects look real and 3D by copying the painting.

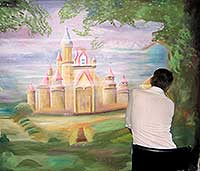
- Paint the background in first. Mix the paint on the brush as you go, but don’t ‘mix’ it all up, what I mean is shade the objects by brushing on one colour then another. Use white with a dark colour to go from dark to light. If the result is too dark, add some light, and vice versa. The less paint colours you use and the more mixed colours you create the more variation you will end up with. I have found it is easy to draw wood grain by going over a light tan with a brush lightly dipped dark brown, brushed down the canvas when they are both wet, but don’t go over it too much or you will just mix the two colours together. Most of my painting is done wet on wet. Other effects can be done over dry, especially other grain marks and shading in black just touching the canvas, while moving the brush at high speed. Too close can mess it up, so experiment on a sample first! Little bits of white are also best added dry or almost dry to indicate light falling on a protrusion. Background shading, like a sky with clouds look great when you draw a building or spire through the middle, as the cloud continues both sides. Never draw the spire and then try and paint the cloud either side of it. The same goes for stairs. Paint the wall, windows and curtains first, then paint in the balustrade. Paint the back objects first them move to the front.
- Big is great for the foreground. Try and have some sort of exit, either a door or opening in the picture. Use stronger colours for the foreground as well. Before you start, work out where the sun or the main source light is coming from so you can put in the light and dark shading. The secret of making the image stand out rather than a flat 2D picture is in the shading, and adding that dot or streak of white can turn a circle into a sphere or a rectangle into a column. Remember if the light is coming from the left, a window ( or recess), will have shadow on the left and more light on the right of the window frame. However a protrusion will have the shading reversed.
- When you have done most of the work, some objects look better if you frame (draw a line) with black on the shadow side, and white on the light side. Don’t draw lines around every thing, however if two light objects intersect, a darker / lighter line may be needed to show the shape.
- Don’t forget to stand back and take in the effects. Some look good so try and reproduce those, others don’t look so good so let them dry and paint over them. Don’t be too critical as the actors should be good enough so the audience wont have time to be too critical of the back drops.

Have fun.


